Download Xara 3D Maker: A Guide for Beginners
If you want to create stunning 3D graphics and animations for your website or video, you might think that you need expensive software or professional skills. But that’s not true. With Xara 3D Maker, you can easily transform text and shapes into high-quality 3D objects with just a few clicks. In this article, we will show you how to download, install, and use Xara 3D Maker, as well as some tips and tricks to make your 3D creations stand out.
What is Xara 3D Maker?
Xara 3D Maker is a software that allows you to create 3D graphics and animations in a simple and intuitive way. You can use it to make logos, titles, headings, banners, buttons, icons, and more. You can also animate your 3D objects with various effects, such as rotation, swing, fade, pulsate, etc. You can export your 3D graphics and animations as images, GIFs, AVIs, or SWFs, and use them on your website or video.
Xara 3D Maker is compatible with Windows XP, Vista, 7, 8, and 10. It has a trial version that lasts for 7 days (but can be extended to 30 days on registration), and a full version that costs $39.99. You can download it from the official website or from other sources .
How to download and install Xara 3D Maker
To download and install Xara 3D Maker, follow these steps:
- Go to the official website or any other source and click on the “Download” button.
- Save the installer file (xara_3d_maker_7_en.exe) to your desktop or other downloads folder.
- Run the installer file (double-click on it) and follow the on-screen instructions.
- We recommend you stop any registry protection utilities before attempting to install as they can prevent the application from installing correctly.
- If you are running Windows XP, you must log on to your PC using an administrator account.
- Once the installation is complete, you can launch Xara 3D Maker from the Start menu or the desktop shortcut.
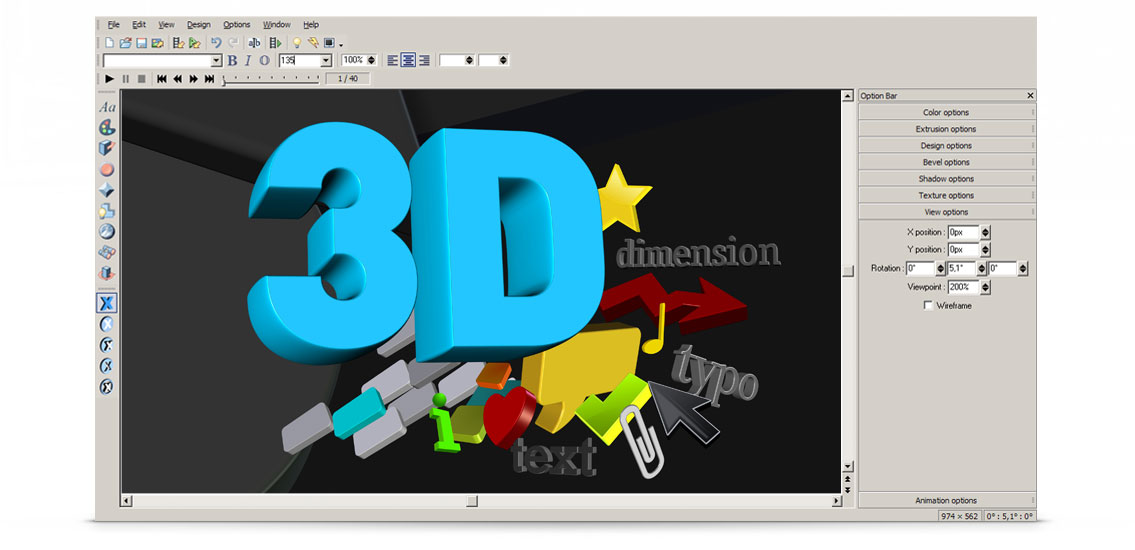
How to use Xara 3D Maker
Using Xara 3D Maker is very easy and fun. You can create amazing 3D graphics and animations in minutes. Here are some basic steps to get you started:
How to create 3D text and shapes
To create a new document in Xara 3D Maker, click on the “File” menu and select “New”. You will see a blank canvas with a default text object. You can edit the text by double-clicking on it or by using the “Text” toolbar at the top. You can also change the font, size, alignment, spacing, etc. of your text from the same toolbar.
To create a new shape object, click on the “Shape” toolbar at the top and select one of the predefined shapes (such as cube, sphere, cone, etc.). You can also draw your own shape by using the “Freehand Shape” tool. You can resize, rotate, move, or delete your shape object by using the handles around it or by using the “Object” toolbar at the top.
How to customize the style, color, and texture of your 3D objects
To customize the appearance of your 3D objects, you can use the “Style”, “Color”, and “Texture” tabs on the right panel. You can choose from a variety of presets or create your own style by adjusting the sliders and options. You can also apply different effects, such as transparency, reflection, glow, etc. to your 3D objects.
How to animate your 3D objects
To animate your 3D objects, you can use the “Animation” tab on the right panel. You can choose from a number of predefined animations, such as rotate, swing, fade, pulsate, etc. or create your own animation by using the “Custom Animation” tool. You can also adjust the speed, direction, loop, and delay of your animation. You can preview your animation by clicking on the “Play” button at the bottom.
How to export and share your 3D graphics and animations
To export and share your 3D graphics and animations, you can use the “File” menu and select “Export”. You can choose from different formats, such as image (JPG, PNG, BMP), GIF, AVI, or SWF. You can also adjust the quality, size, and frame rate of your output file. You can save your file to your computer or upload it to a web server or an online gallery.
Tips and tricks for using Xara 3D Maker
To make the most out of Xara 3D Maker, here are some tips and tricks that you can use:
How to use templates and presets
If you want to save time and effort, you can use the templates and presets that Xara 3D Maker offers. You can access them from the “File” menu and select “Open Template” or “Open Preset”. You can browse through different categories and themes of 3D graphics and animations that you can use or modify for your own project.
How to use the extrude tool and the bevel tool
If you want to add depth and dimension to your 3D objects, you can use the extrude tool and the bevel tool. The extrude tool allows you to change the thickness of your 3D object by dragging the slider or entering a value. The bevel tool allows you to change the shape of the edges of your 3D object by choosing from different types and sizes of bevels.
How to use the lighting and shadow effects
If you want to add realism and contrast to your 3D objects, you can use the lighting and shadow effects. The lighting effect allows you to change the direction, color, intensity, and type of light that illuminates your 3D object. The shadow effect allows you to change the position, color, blur, and opacity of the shadow that is cast by your 3D object.
Conclusion
Xara 3D Maker is a powerful and easy-to-use software that allows you to create stunning 3D graphics and animations for your website or video. You can download it from the official website or from other sources and try it for free for 7 days (or 30 days on registration). You can also buy it for $39.99 if you want to enjoy its full features. With Xara 3D Maker, you can transform text and shapes into high-quality 3D objects with just a few clicks. You can also customize the style, color, texture, animation, lighting, and shadow of your 3D objects. You can export your 3D graphics and animations as images, GIFs, AVIs, or SWFs, and use them on your website or video. Xara 3D Maker is compatible with Windows XP, Vista, 7, 8, and 10.
We hope this article has helped you learn how to download, install, and use Xara 3D Maker, as well as some tips and tricks to make your 3D creations stand out. If you have any questions or feedback, please feel free to leave a comment below. We would love to hear from you. Thank you for reading and happy 3D making!
FAQs
Here are some frequently asked questions about Xara 3D Maker:
- Q: How can I extend the trial period of Xara 3D Maker?
- A: You can extend the trial period of Xara 3D Maker from 7 days to 30 days by registering your email address on the official website. You will receive a confirmation email with a link to activate your extended trial.
- Q: How can I upgrade to the full version of Xara 3D Maker?
- A: You can upgrade to the full version of Xara 3D Maker by clicking on the “Buy Now” button on the official website or on the software itself. You will be redirected to a secure payment page where you can choose your preferred payment method and complete your purchase. You will receive an email with your license key and instructions on how to activate your full version.
- Q: How can I get support for Xara 3D Maker?
- A: You can get support for Xara 3D Maker by visiting the official website and clicking on the “Support” menu. You will find a user guide, tutorials, videos, forums, and contact information for technical support.
- Q: How can I learn more about Xara 3D Maker?
- A: You can learn more about Xara 3D Maker by visiting the official website and clicking on the “Learn” menu. You will find a gallery of examples, tips and tricks, reviews, and testimonials from other users.
- Q: How can I uninstall Xara 3D Maker?
- A: You can uninstall Xara 3D Maker by going to the Control Panel on your Windows PC and selecting “Programs and Features”. You will see a list of installed programs on your PC. Find and select “Xara 3D Maker 7” and click on the “Uninstall” button. Follow the on-screen instructions to complete the uninstallation process.
bc1a9a207d